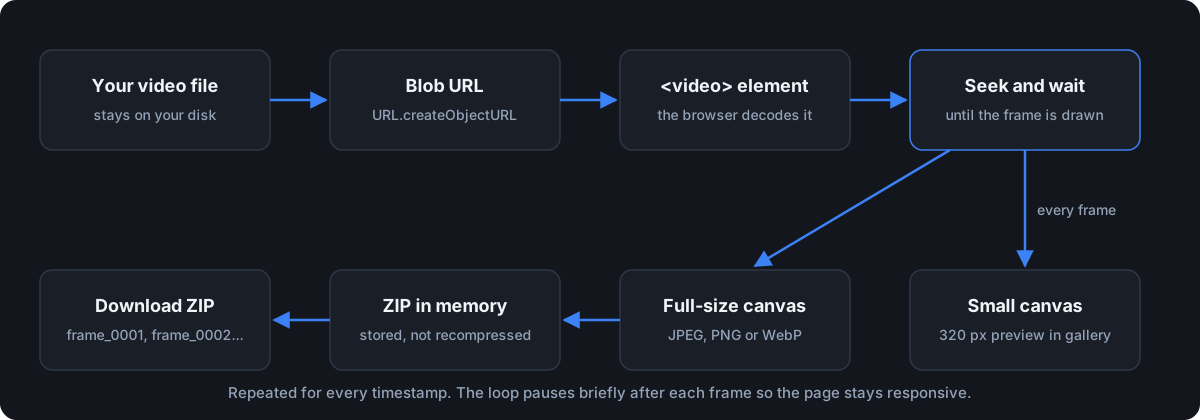
FrameRipper does not process video on a server. The whole extraction runs in your browser tab, in a couple of hundred lines of JavaScript, using parts every modern browser already ships: a video element to decode the file, a canvas to capture frames, and a small ZIP library to package them.
This post walks through that code in the order it runs. The snippets are simplified from the real component, but the logic is the same, including the parts that took a few attempts to get right.
The whole thing in five steps
- 1Turn the file you picked into a local blob URL, so the browser can play it without uploading anything.
- 2Read the video’s duration, width and height.
- 3Work out which moments to capture.
- 4For each moment: seek there, wait until that frame has really been decoded, draw it onto a canvas and encode it as an image.
- 5Add every image to a ZIP, with a small preview in the gallery as it goes.
Step 1: a blob URL instead of an upload
When you choose a file, the page calls URL.createObjectURL on it. That returns a URL starting with blob: which points at the file on your own disk. A video element can play it like any other source, but the bytes never go anywhere.
Before showing any controls, a throwaway video element loads only the metadata, to read the duration and the frame size. If that fails, the browser cannot decode the codec inside the file, and the tool says so immediately instead of failing halfway through an extraction.
Reading duration and size without uploading anything
const url = URL.createObjectURL(file);

const probe = document.createElement('video');
probe.preload = 'metadata';
probe.muted = true;
probe.src = url;

probe.onloadedmetadata = () => {
  setDuration(probe.duration);
  setVideoDims({ w: probe.videoWidth, h: probe.videoHeight });
};
probe.onerror = () => {
  setError("Browser can't decode this video.");
};
Step 2: picking the moments
Frames are spaced evenly by time, and each one is taken from the middle of its slice of the video rather than the start. Sampling the start of each slice would make the first capture 0:00, which is nearly always black, a fade or a title card.
In code it is a single line. The Math.min clamp in it keeps the last timestamp a millisecond short of the end, because seeking to the exact final timestamp fails on more files than you would expect.
Working in time rather than frame numbers also means variable frame rate footage, such as screen recordings and most phone video, still comes out evenly spaced. Frames per second explained covers why that matters.
Midpoint sampling
const timestamps = Array.from({ length: count }, (_, i) =>
  Math.min(duration - 0.001, (duration / count) * (i + 0.5))
);
Step 3: seeking
Setting video.currentTime starts a seek, and the video fires a seeked event when it gets there. Two things go wrong with the obvious version. If the video is already at that exact time, no event fires at all, so the code would wait forever. And a few files never finish seeking near their end.
So the seek is wrapped in a promise that returns straight away in the first case and gives up after five seconds in the second. A frame that cannot be reached is skipped, and the loop moves on.
A seek that always finishes
function seekTo(video, time, timeout = 5000) {
  return new Promise((resolve) => {
    if (Math.abs(video.currentTime - time) < 1e-3) return resolve(true);

    const timer = setTimeout(() => resolve(false), timeout);
    video.addEventListener('seeked', () => {
      clearTimeout(timer);
      resolve(true);
    }, { once: true });

    video.currentTime = time;
  });
}
Step 4: waiting for the decoded frame
Even after seeked fires, the new frame is not always ready to draw. Capture too early and you get the previous frame, the kind of bug you only notice when two frames that should differ come out identical.
The right signal is requestVideoFrameCallback, which fires when the browser has actually presented a new frame. Older browsers do not have it, so there is a fallback of two animation frames. There is also a 200 millisecond cap, because a video that did not move (the already-at-that-time case) never presents a new frame, and the callback would never come.
Waiting until the frame is really there
function waitForPainted(video) {
  if (typeof video.requestVideoFrameCallback === 'function') {
    return new Promise((done) => {
      video.requestVideoFrameCallback(() => done());
      setTimeout(done, 200);
    });
  }
  return new Promise((done) =>
    requestAnimationFrame(() => requestAnimationFrame(done))
  );
}
Step 5: two canvases per frame
Each frame is drawn twice. Once onto a canvas at the video’s full resolution, which canvas.toBlob encodes as JPEG, PNG or WebP for the ZIP. And once onto a small canvas, no more than 320 pixels on its long side, which becomes the preview in the gallery.
The small one is there to save memory. A decoded 4K frame takes about 33 MB (3840 x 2160 pixels at 4 bytes each), so a gallery of full-size previews would run a phone out of memory long before the ZIP was finished. The previews are tiny JPEGs instead, and only the ones on screen are shown.
Both canvases are cleared before every draw. With ordinary video that changes nothing, because each frame covers the whole canvas. With transparent WebM it matters: drawing onto an uncleared canvas left the previous frame showing through the see-through areas. That was a real bug, fixed in October 2026.
One frame into the ZIP
fullCtx.clearRect(0, 0, fullCanvas.width, fullCanvas.height);
fullCtx.drawImage(video, 0, 0, fullCanvas.width, fullCanvas.height);

const blob = await new Promise((res) => fullCanvas.toBlob(res, mime, quality));
zip.file(`frame_${String(n).padStart(4, '0')}.${ext}`, blob);
The ZIP, and where the 10,000 frame cap comes from
JSZip builds the archive in memory. Compression is set to STORE, meaning none at all. That sounds wrong until you remember the images are already compressed: running JPEG or PNG data through ZIP’s deflate saves almost nothing and costs a lot of CPU time, which you notice most on a phone.
Filenames are zero-padded (frame_0001, frame_0002) so they sort correctly in every file manager and import in order into other tools.
Every image stays in memory until you download the ZIP, and that is the reason for the cap of 10,000 frames per run. The video to frames page has more on working within it.
Keeping the page usable while it works
The loop hands control back to the browser after every frame, with a zero-length timeout, so the page can repaint and the Abort button keeps working. Abort is an AbortController that the loop checks between every step, and whatever was captured before you pressed it still goes into the ZIP.
The gallery used to re-render after every single frame, copying the whole list of previews each time. That is fine for 50 frames and slow at 2,000, so it now refreshes a few times a second instead.
Why it uses the video you can see
There is no hidden second video element. Extraction reuses the preview player on the page. A second element would mean a second decoder working on the same file, roughly doubling memory use, and memory is exactly what runs out first on phones.
On iPhone there is a second reason: the visible player is the one you can press play on, and Safari does not reliably hand over frames from a video that has never been played. Why iPhone needs one tap on play first explains that in detail.
What the browser cannot do
All of this depends on the browser’s own decoder, so anything it cannot decode is out of reach: ProRes, DNxHD, and HEVC in browsers without hardware support. For those, and for features like scene-change detection, FFmpeg is the better tool. For everything a browser can play, this pipeline gets you every frame at full resolution without the file leaving your machine.
Try FrameRipper - free, no upload
Extract frames from any video directly in your browser. No sign-up, no file size limits.
Open FrameRipper